Lasse Schultebraucks Senior IT Consultant
Testing services in Angular
Testing in Software Development is essential. In this blog post I will demonstrate how Testing in Angular works by testing a service with Jasmine and Karma by build a simple Angular application. I also try to answer the question why and how to test.
Why should you testing?
There are several good reason to write tests for your application.
- Keeping sure everything works fine after making changes
- Detecting early errors in development process
- To ensure that the application does what it is supposed to do
- To ensure that the application work on different devices, browsers etc.
- To keep the quality of the final application high
- Build up trust in the application
These are in my opinion the core reason why everybody should test. But there is another big reason why it is so important to test software. As software grows the complexity grows with it. For the developer it becomes more and more difficult to make chances in code and without testing the trust in their software application is low. Software application with tests have a high trust and in general high quality standards. Errors in code will be detected because of testing early in the development process and therefore the software developer are not scared to make changes in code. Because of that as complexity grows the development process still not slowing down heavily.
How should you test?
There are different kind of testing methods in Software Development. Let us quickly refresh the different kinds of testing in Software Development.
End-To-End-Tests (E2E)
End-To-End-Test are test where you directly test the running application. Selenium Web Driver is e.g. a popular framework to test them directly in the browser e.g. by clicking buttons and looking for the expected results. In Angular there is also Protractor, but I will not concentrate on these kinds of test in this blog post. E2E Tests are extremely useful, because they can represent the user behavior and can simulate all different kinds of use cases.
Unit Tests
Unit Tests call functions and other small pieces of code to make sure that they work as intended. In comparing to E2E Tests Unit Tests are only testing the logic and not the final behavior of your code.
Integration Tests
Integration Tests are similair to Unit Tests, but instead of testing only one by one each function and logic in your code, they are combining different logical parts of your code and testing if they work together. In the following GIF, you can see how the construct fails because there were only two unit tests but no integration test to ensure that a window can be opened.
Testing in Angular
Okay, now lets get started with Testing in Angular. As I said previous, I will concentrate on writing tests for services. I will do that with Jasmine and Karma.
Jasmine
Jasmine is a test framework for JavaScript application which is independent to other frameworks. It runs it test with a basic HTML test runner in the browser. Let us briefly look over the core features of Jasmine:
- Suites describe(string, function) are functions which are containing a title and a functions which containing one or more specs.
- Specs it(string, function) are function in Suits which are containing the logic of each test including the expectation(s).
- Expectations expect(actual).toBe(expected) are assertions in the specs. If an assertion is false, the spec fails, otherwise the test is passed.
- Matchers like toBe(expected), not or toBeNull() are helpers for assertions.
Karma
On the other hand Karma is a advanced test runner for writing Unit Tests. With Karma our Jasmine Test automatically can run in the browser if we are making chances to our test code. That is very nice.
Testing a Service
In the following I will code up a small Angular application with a service for testing purposes. You can find the code on GitHub.
After I have created a new Angular project with ng new angular-testing I go to the src/app folder and create a new service with ng g s app. The AppService will be a simple service which manages a string array. Let us define the tests first before we are building our service. The AppService should have 4 methods: getItems() should return the string array, addItem(item: string) should let us add new items to the array, deleteItem(index: number) should delete a item in the array with a specific index and last but not least getSize() should return as the length of the array. Our empty automatically generated app.service.spec.ts file from the Angular-CLI looks like following.
import {TestBed, inject} from '@angular/core/testing';

import {AppService} from './app.service';

describe('AppService', () => {
  beforeEach(() => {
    TestBed.configureTestingModule({
      providers: [AppService]
    });
  });

  it('should be created', inject([AppService],
    (service: AppService) => {
      expect(service).toBeTruthy();
    }));
});
Beside our AppService there are two more imports: TestBed and inject. TestBed is one of the most important testing utilities in Angular. It enables us to create a testing module of @NgModule. It can be further configured, but we do not need this for our use case. We just need to provide our service. We do this in beforeEach() to make sure that each spec is indpendet from each other. On the other side we have inject which we will use for the specs. The inject function has two parameters. The first parameter is an array of all the services it want to inject from. In our case we just want to inject from our AppService. The second parameter corresponds to the services of the array in the first parameter. Okay, now we can write our tests for the our AppService to test the 4 methods.
import {TestBed, inject} from '@angular/core/testing';

import {AppService} from './app.service';

describe('AppService', () => {
  beforeEach(() => {
    TestBed.configureTestingModule({
      providers: [AppService]
    });
  });

  it('should be created', inject([AppService],
    (service: AppService) => {
      expect(service).toBeTruthy();
    }));

  it('should be empty', inject([AppService],
    (service: AppService) => {
      expect(service.getSize()).toBe(0);
    }));

  it('should contain an item with value first',
    inject([AppService], (service: AppService) => {
      const item: string = 'first';
      service.addItem(item);
      expect(service.getItems()[0]).toBe(item);
      expect(service.getSize()).toBe(1);
    }));

  it('should contain an item with value first and an item with the value second',
    inject([AppService], (service: AppService) => {
      const firstItem: string = 'first';
      const secondItem: string = 'second';
      service.addItem(firstItem);
      service.addItem(secondItem);
      expect(service.getItems()[0]).toBe(firstItem);
      expect(service.getItems()[1]).toBe(secondItem);
      expect(service.getSize()).toBe(2);
    }));

  it('should contain an item with value second after deleting the first item',
    inject([AppService], (service: AppService) => {
      const firstItem: string = 'first';
      const secondItem: string = 'second';
      service.addItem(firstItem);
      service.addItem(secondItem);
      service.deleteItem(0);
      expect(service.getItems()[0]).toBe(secondItem);
      expect(service.getSize()).toBe(1);
    }));

  it('should contain an item with value first after deleting the second item',
    inject([AppService], (service: AppService) => {
      const firstItem: string = 'first';
      const secondItem: string = 'second';
      service.addItem(firstItem);
      service.addItem(secondItem);
      service.deleteItem(1);
      expect(service.getItems()[0]).toBe(firstItem);
      expect(service.getSize()).toBe(1);
    }));

});
Implementing the Service after defining the tests
After the tests have been write, we have to implement the function for our services before we can run our test.
import { Injectable } from '@angular/core';

@Injectable()
export class AppService {
  private _items: string[] = [];

  constructor() { }

  public getItems(): string[] {
    return this._items;
  }

  public addItem(item: string) {
    this._items.push(item);
  }

  public deleteItem(index: number) {
    if (index < this.getSize()) {
      this._items.splice(index, 1)
    }
  }

  public getSize(): number {
    return this._items.length;
  }
}
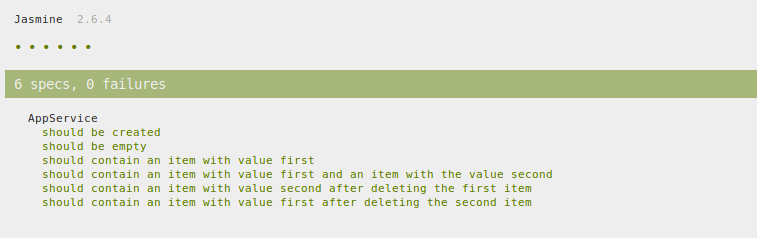
After we have done this, we can run npm test. This command opens a new browser window. It seems that all our test have passed.
Great! Let us go back to our tests and let them fail by changing a value in the assertions. I will change in the second the expected value from 0 to 1. We will have now a failing test.
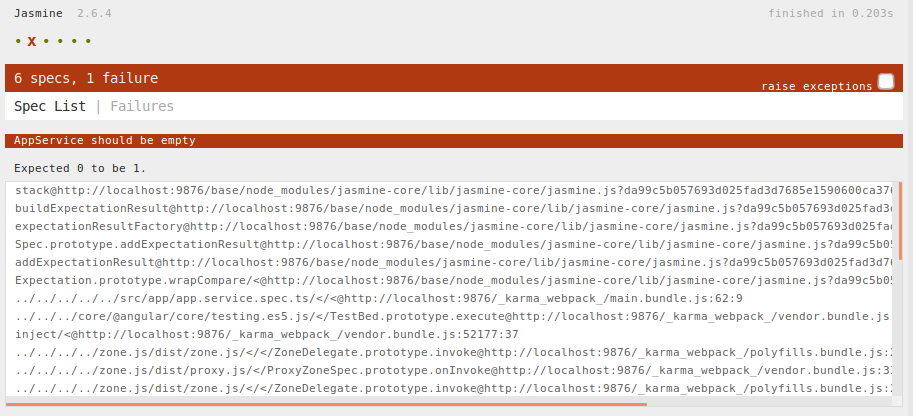
We expected the length of an empty array to be 1, but this is wrong. This time we intentionally crashed our test, so let us correct it quickly by changing the expected value from 1 to 0.
Test-Driven Development (TDD) Approach
As you might noticed I first have wrote the tests before I have implemented the service. This is because I have tried to developed after the Test-Driven Development approach. The main idea here is to write the test before writing production code to be more productive and create a higher software quality. But this blog post is not about TDD, therefore I will not go in detail here. Maybe another time.
App Component
Okay, great. We have a service, which passed all the tests. We now have to write more production code to use the service in a real component. If you only were interesting in testing a service with Jasmine and Karma you can skip this part. In the last part of this blog post I will just finish building the Angular application.
To use the AppService in a component, we have to provide it in the app.module.ts. I will also import the ReactiveFormsModule here, because I will use it later in the app.component.ts to create a form.
import { BrowserModule } from '@angular/platform-browser';
import { NgModule } from '@angular/core';
import { ReactiveFormsModule } from '@angular/forms';

import { AppComponent } from './app.component';
import {AppService} from "./app.service";

@NgModule({
  declarations: [
    AppComponent,
  ],
  imports: [
    BrowserModule,
    ReactiveFormsModule
  ],
  providers: [AppService],
  bootstrap: [AppComponent]
})
export class AppModule { }
We will only have one component in our Angular application. The template will look like following.
<div class="container">
  <form [formGroup]="form">
    <div class="form-group">
      <div class="row">
        <div class="col-md-2">
          <label for="addItem">New Item:</label>
        </div>
        <div class="col-md-3">
          <input id="addItem" class="form-control" formControlName="item">
        </div>
        <div class="col-md-1">
          <button type="submit" (click)="onSubmit()" class="btn btn-primary">Add Item</button>
        </div>
      </div>
    </div>
  </form>
  <div>
    <ul *ngFor="let item of appService.getItems(); let i = index">
      <li>

        <button style="margin-left: 20px" class="btn btn-danger" (click)="appService.deleteItem(i)">Delete</button>
      </li>
    </ul>
  </div>
</div>
And in addition the app.component.ts.
import {Component, OnInit} from '@angular/core';
import {AppService} from "./app.service";
import {FormBuilder} from "@angular/forms";

@Component({
  selector: 'app-root',
  templateUrl: './app.component.html',
  styleUrls: ['./app.component.css']
})
export class AppComponent implements OnInit{
  form;

  ngOnInit() {
    this.form = this.fb.group({
      item: ''
    });
  }

  constructor(public appService: AppService, private fb: FormBuilder) {
  }

  onSubmit() {
    this.appService.addItem(this.form.get('item').value);
    this.form.reset();
  }
}
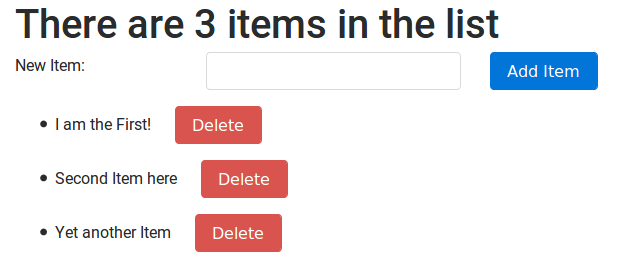
The app.component.ts creates a simple form in his ngOnInit() cycle. I do it with the FormBuilder, which I declare in the constructor next to our AppService, which I use in the onSubmit() method to add a new item. Our application now looks like following (I have added some bootstrap to make it prettier).

We can now type in the name of our new item we want to add and can add the item by clicking on the button. This will update the count on the header on the top and will also show up all items in a list in the bottom.
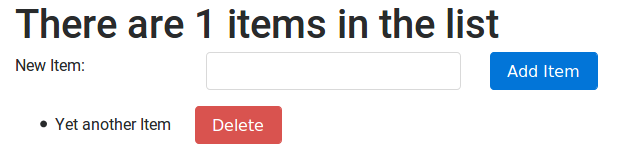
By clicking on the Delete button we can delete the items one by one.
Resume
Testing is essential for Software Development, because it ensure the quality of the final application. In this blog post I have demonstrated a way of testing services in Angular with Jasmine and Angular.
Written on October 7th, 2017 by Lasse Schultebraucks