Lasse Schultebraucks Senior IT Consultant
Android Firebase Authentication with Firebase UI
Many apps need safe, fast and easy user authentication to save user personal data. To achieve this, you do not have to build your own authentication system and you do not want to care much about backend.
With Firebase Authentication you can write in some lines of code your whole authentication system for your app.
Firebase is a product by Google, which offers tools to built awesome features into your app. For more information about Firebase click here.
In this post, I write about Firebase Authentication and Firebase UI, and how easy you can implement it into your app (project is available on GitHub). So let’s start!
Firebase Setup
First you have to implement Firebase into your app. To start, go to the Firebase Console and click on “Create new Project”.
Then enter your project name and country, where you live and click “Create Project”.
After that, click on “Add Firebase to your Android app” and enter your package name and your SHA-1 key. To find out your SHA1-key, go to Android Studio, open the terminal and enter:
keytool -exportcert -list -v -alias androiddebugkey -keystore ~/.android/debug.keystore
The default password is “android”. After clicking “Add app”, download the .json File and add it to your Android Project in the app folder.
Okay great, now go back to Android Studio. We have to change some lines in our gradle files first.
Thats how my app level build.gradle file looks like:
apply plugin: 'com.android.application'

android {
    compileSdkVersion 25
    buildToolsVersion "25.0.1"
    defaultConfig {
        applicationId "com.schultebraucks.lasse.firebaseauthenticationexample"
        minSdkVersion 16
        targetSdkVersion 25
        versionCode 1
        versionName "1.0"
        testInstrumentationRunner "android.support.test.runner.AndroidJUnitRunner"
    }
    buildTypes {
        release {
            minifyEnabled false
            proguardFiles getDefaultProguardFile('proguard-android.txt'), 'proguard-rules.pro'
        }
    }
}

dependencies {
    compile fileTree(dir: 'libs', include: ['*.jar'])
    androidTestCompile('com.android.support.test.espresso:espresso-core:2.2.2', {
        exclude group: 'com.android.support', module: 'support-annotations'
    })
    compile 'com.android.support:appcompat-v7:25.2.0'
    compile 'com.google.firebase:firebase-auth:10.0.1'
    compile 'com.firebaseui:firebase-ui-auth:1.1.1'
    compile 'com.firebaseui:firebase-ui:1.2.0'
    testCompile 'junit:junit:4.12'
}
apply plugin: 'com.google.gms.google-services'
Important lines you have to add in your app-gradle are lines 28-30 and lines 33.
Next lets watch in the other gradle File:
// Top-level build file where you can add configuration options common to all sub-projects/modules.

buildscript {
    repositories {
        jcenter()
        mavenLocal()
    }
    dependencies {
        classpath 'com.android.tools.build:gradle:2.2.3'
        classpath 'com.google.gms:google-services:3.0.0'

        // NOTE: Do not place your application dependencies here; they belong
        // in the individual module build.gradle files
    }
}

allprojects {
    repositories {
        jcenter()
        mavenLocal()
        // Required for 'com.firebaseui:firebase-ui:1.1.1'
        maven {
            url 'https://maven.fabric.io/public'
        }
    }
}

task clean(type: Delete) {
    delete rootProject.buildDir
}
We have to make here two changes.
First we have to add the classpath of the Google Play Services.
Second we have to add the maven Repository, which is required for the Firebase UI, which we are using.
Layout of the MainActivity
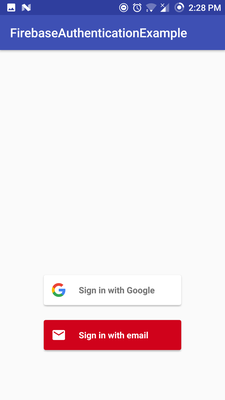
First lets build the User interface for our MainActivity. We just need a TextView and a Button. We do not have to care about the UI of the Login Screen, because Firebase UI have already implemented it. So we just code a TextView, which shows our Username and a Button, so we can log out.
<?xml version="1.0" encoding="utf-8"?>
<RelativeLayout
    xmlns:android="http://schemas.android.com/apk/res/android"
    xmlns:tools="http://schemas.android.com/tools"
    android:id="@+id/activity_main"
    android:layout_width="match_parent"
    android:layout_height="match_parent"
    android:paddingBottom="@dimen/activity_vertical_margin"
    android:paddingLeft="@dimen/activity_horizontal_margin"
    android:paddingRight="@dimen/activity_horizontal_margin"
    android:paddingTop="@dimen/activity_vertical_margin"
    tools:context="com.schultebraucks.lasse.firebaseauthenticationexample.MainActivity">

    <TextView
        android:layout_width="wrap_content"
        android:layout_height="wrap_content"
        android:id="@+id/user_name_text_view"
        android:layout_centerVertical="true"
        android:layout_centerHorizontal="true"/>

    <Button
        android:layout_width="wrap_content"
        android:layout_height="wrap_content"
        android:text="@string/sign_out"
        android:layout_below="@+id/user_name_text_view"
        android:id="@+id/sign_out_button"
        android:layout_centerHorizontal="true"/>
</RelativeLayout>
The MainActivity
Okay, no we have done the setup of Firebase and designed our layout for our MainActivity. So let’s start with the actually implementation with authentication process.
But first, we have to go back to our Firebase Console and go to Authentication -> Sign In Method and activate Email/password and Google.
Back in Android Studio, we first declare our TextView, Button, a FirebaseAuth instance, FirebaseAuth Listener and a constant.
private static final int RC_SIGN_IN = 1;

private FirebaseAuth mAuth;
private FirebaseAuth.AuthStateListener mAuthStateListener;
private TextView mUserNameTextView;
private Button mSignOutButton;
In onCreate(...), we then will declare our widgets and Auth objects. We see here, Firebase Auth seems to be an object of a singeton pattern.
@Override
protected void onCreate(Bundle savedInstanceState) {
    super.onCreate(savedInstanceState);
    setContentView(R.layout.activity_main);

    mUserNameTextView = (TextView) findViewById(R.id.user_name_text_view);
    mSignOutButton = (Button) findViewById(R.id.sign_out_button);

    mAuth = FirebaseAuth.getInstance();
    mAuthStateListener = new FirebaseAuth.AuthStateListener() {
        @Override
        public void onAuthStateChanged(@NonNull FirebaseAuth firebaseAuth) {
            FirebaseUser user = firebaseAuth.getCurrentUser();
            if (user != null) {
                // User is signed in
                mUserNameTextView.setText(user.getDisplayName());
            } else {
                // User is signed out
                startActivityForResult(
                        AuthUI.getInstance()
                                .createSignInIntentBuilder()
                                .setProviders(Arrays.asList(
                                        new AuthUI.IdpConfig.Builder(AuthUI.EMAIL_PROVIDER).build(),
                                        new AuthUI.IdpConfig.Builder(AuthUI.GOOGLE_PROVIDER).build()))
                                .build(),
                        RC_SIGN_IN);
            }
        }
    };
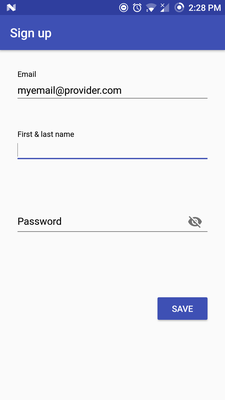
Okay, here our magical happens. The AuthStateListener listens, if a user is already signed in. If this is the case, we set the name of our user in our UserNameTextView, else we start an Activity for Result and start with Firebase UI our Log in Screen, where the user can choose between Email/password Sign-in and Google Sign-In.
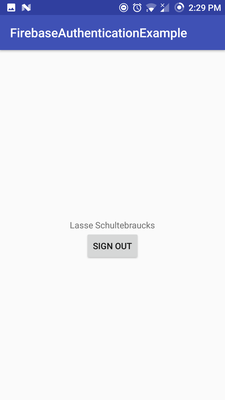
Last but not least we add an OnClickListener to our Button, which lets the User Sign out, if he clicks the Button.
Also we lets add the AutStateListener after onStart() and remove the AuthStateListener after onStop(), so it fits our Activity lifecycle.
@Override
protected void onCreate(Bundle savedInstanceState) {
    super.onCreate(savedInstanceState);
    setContentView(R.layout.activity_main);

    mUserNameTextView = (TextView) findViewById(R.id.user_name_text_view);
    mSignOutButton = (Button) findViewById(R.id.sign_out_button);

    mAuth = FirebaseAuth.getInstance();
    mAuthStateListener = new FirebaseAuth.AuthStateListener() {
        @Override
        public void onAuthStateChanged(@NonNull FirebaseAuth firebaseAuth) {
            FirebaseUser user = firebaseAuth.getCurrentUser();
            if (user != null) {
                // User is signed in
                mUserNameTextView.setText(user.getDisplayName());
            } else {
                // User is signed out
                startActivityForResult(
                        AuthUI.getInstance()
                                .createSignInIntentBuilder()
                                .setProviders(Arrays.asList(
                                        new AuthUI.IdpConfig.Builder(AuthUI.EMAIL_PROVIDER).build(),
                                        new AuthUI.IdpConfig.Builder(AuthUI.GOOGLE_PROVIDER).build()))
                                .build(),
                        RC_SIGN_IN);
            }
        }
    };

    mSignOutButton.setOnClickListener(new View.OnClickListener() {
        @Override
        public void onClick(View v) {
            signOut();
        }
    });
}

private void signOut() {
    FirebaseAuth.getInstance().signOut();
    mUserNameTextView.setText("");
}

@Override
public void onStart() {
    super.onStart();
    mAuth.addAuthStateListener(mAuthStateListener);
}

@Override
public void onStop() {
    super.onStop();
    if (mAuthStateListener != null) {
        mAuth.removeAuthStateListener(mAuthStateListener);
    }
}
(The full code is also available on GitHub)
Okay, that was all you have to do, to implement Firebase Authentication into your app.
Summary
With Firebase, you can implement very easy nice features into your app. It is very easy to understand, and you also do not have to write a lot of code.
Written on February 27th, 2017 by Lasse Schultebraucks